Help: Rent Payment Management

Event Box
Dock
Menu Bar
New Conversation
Export
Settings
Attachment
Search
Sent to server
Cancel
Recipient has read
Back
Contact info
Main
Payment info
RENT PAYMENT MANAGEMENT
AUTOMATION FEATURE
Manage Tenancy Agreement
Add a new Property#
-
Tap on the "Settings" icon
-
Press the "Property List" button
-
Press the "New Property" button
-
Fill in the blank fields
-
Tap on the "Save" button (top right)
-
The new property is ready to use
Edit a Property#
-
Tap on the "Settings" icon
-
Press the "Property List" button
-
Select the property on the "Property List"
-
Tap on the "Edit" button (top right)
-
Edit the property information
-
Tap on the "Save" button (top right)
-
The edited property is ready to use
Create and share a QR code for a property#
-
Tap on the "Settings" icon located in the top right corner of the screen.
-
Select "Property List."
-
Choose the property you want to create a QR code for.
-
Tap on the "QR Code" icon located at the bottom of the screen.
-
The QR code for the property will now be generated. To share it, simply capture a screenshot of the code on your phone and paste it onto any media platform along with relevant information such as photos, address, size, and contact information.
Remove a Property#
-
Tap on the "Settings" icon
-
Press the "Properties List" button
-
Select the property on the "Property List"
-
Press the "Edit" button (top right)
-
Tap on e "Delete Property" button (bottom)
-
The property will be deleted from the list
Add/ Edit a Tenancy Agreement#
-
Tap on the "HOME" icon and select "Agreement" in the menu bar (see the above diagram)
-
Press the "New" button under the menu bar
-
Press the "New Tenancy Agreement" button
-
Tap on "Done" to accept the warning message
-
Fill in the blank fields
+ Select the property from the registered property list (if the property is not registered, please add the property on the list first)
+ Select the Landlord (the asset/property owner)
+ Select the Landlord Representative (if any)
- If the landlord representative is added, an admin role switch will appear for the selection
(Admin) the user executes on behalf of the landlord
(Read-only) the user can read the transaction only
Case 1: The landlord (Mr. Montague) manages this property by himself.

Case 2: The landlord (Mr. Montague) assigns his asset manager (Susan) to help him manage this property, he needs to be informed the status only.

Case 3: The landlord (Mr. Montague) keeps day to day management. Since, his asset manager (Susan) has all the information, she can follow up in time when needed.

+ Select the Tenant (the liability owner)
+ Select the Tenant Representative (if any)
- If the tenant representative is added, an admin role switch will appear for the selection
(Admin) the user executes on behalf of the tenant
(Read-only) the user can read the transaction only
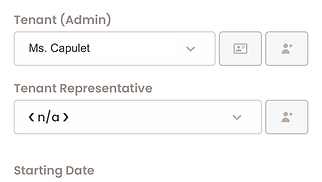
Case 1: The Tenant (Ms. Capulet) manages the lease by herself.
Case 2: The Tenant (Ms. Capulet) assigns her associate (Betty) to help her manage this tenancy management, she needs to be informed the status only.

Case 3: The Tenant (Ms. Capulet) keeps day to day management. Since, her associate (Betty) has all the information, she can follow up in time when needed.
+ Select "Starting Date" (If the starting date of the tenancy agreement is before the date of input, then the system will assume all the transactions on or before the date of input were settled manually.)
+ Select "Termination Date"
+ Input the number of days for "Rent Free Period"# (if any:- the system will exercise the rent-free period from the starting date of the tenancy agreement. If the rent-free period in the original tenancy agreement does not start from the term beginning, the system suggests the user create two or more BeigeApp virtual tenancy agreements to meet the agreed timeline.)
+ Select the rent payment schedule# in the "Repeat" field (once-off payment, pay rent every day, every week, every month, or every year)
- If the payment schedule is more complicated, you may press "Advance" button for more options:-
e.g. Rent will be paid on the fifth day of each month.
-
Repeat: Monthly
-
Advance> Every: 1 month(s)
-
Advance> On The: 5
e.g. Rent will be paid on every other Friday.
-
Repeat: Weekly
-
Advance> Every: 2 week(s)
-
Advance> On The: Fri
e.g. Rent will be paid on every other day.
-
Repeat: Daily
-
Advance> Every: 1 day(s)
+ Select the "Rent Type" (Most of the tenancy agreement is "Fixed Rent"#. If, however, the tenancy agreements calculate the rent according to the tenant's revenue e.g. turnover rent, then the user can select "Variable Rent"#. If the "Variable Rent" is applied, the tenant has to input the amount of the rent on the due date.)
e.g. Rent is fixed amount $10,000.
-
Rent Type: Fixed
-
Fixed Rent Amount $: 10000
e.g. Rent is base rent $5,000 plus turnover rent, the turnover rent must be paid in 15 days after the fixed rent date due.
-
Rent Type: Fixed
-
Fixed Rent Amount $: 5000
-
Variable Rent Payment Delay: 15 days
e.g. Rent is base rent $5,000 plus turnover rent, the turnover rent must be paid in the next month.
-
Rent Type: Fixed
-
Fixed Rent Amount $: 5000
-
Variable Rent Payment Delay: 30 days
+ Input "Initial Deposit"# to the landlord
+ Input "Late Charge"#
- the late charge setting is applied to fixed rent input only. If the original tenancy agreement indicates that the late charge can apply to the variable rent as well. The landlord can use "New Payment Request" once the variable rent payment delay. (Press "Statement" in the Menu Bar> "+New"> "New Payment Request")
+ Tap on the " + Add Fee Reminder" button (The user can also set other payment# request reminders for the tenancy agreement requirement e.g. Management Fee, Tax, and any other expenses.)
+ Tap on "Rename" to label the payment reminder label
+ Input the amount
+ Input the frequent
+ Fill in the "Landlord Bank Account#" for reference
+ Input "Remarks" for reference
6. Tap on the "Save" button (top right)
7. All the parties in the tenancy agreement setting will be invited to use BeigeApp and ask the admin of the counterparty to confirm the settings
+ A "Review Requested" message will be sent to the counterparty (admin) and (reader) in the notification of the "ALERT" screen and "Overview" page in the "HOME" screen.
+ The counterparty (admin) clicks the "Review Requested" message.
+ If the counterparty finds any problems in the setting, he can tap on button "Edit" (top right) for amendment and loop back to the setting creator or tap on the "Reject Agreement" button with reason input.
8. The new tenancy agreement setting is ready once clicking the "Accept Agreement" button by the Landlord (admin) and Tenant (admin)
WARNING: If both the Landlord (admin) and Tenant (admin) accepted the tenancy agreement settings, then the settings can not be edited.
Execute a Tenancy Agreement with a non-BeigeApp user
-
Follow the above instruction to create a new Tenancy Agreement
-
Tap on the "HOME" icon and select "Agreement" in the menu bar (see the above diagram)
-
Press the new Tenancy Agreement with yellow "Await Review" label
-
Tap on the "Exercise Agreement" button twice for confirmation
CAUTION:
If the counter party accepts the tenancy agreement after running as "Sole Execution", the tenancy agreement will proceed as a regular agreement afterward.
If the counter party rejects the tenancy agreement after running as "Sole Execution", the tenancy agreement will not proceed anymore and will show "Rejected".
If the counter party signs up BeigeApp after running as "Sole Execution", the payment transaction has to be verified by the payee even though the agreement is in "Sole Execution" status.
Hidden a Tenancy Agreement#
-
Tap on the "HOME" icon and select "Agreement" in the menu bar (see the above diagram)
-
Swipe the property to the left on the "Property List"
- the "Hidden" icon
Show a hidden Tenancy Agreement
-
Tap on the "HOME" icon and select "Agreement" in the menu bar (see the above diagram)
-
Press the "Filter" icon on the "Agreement" screen
-
Switch on the "Show Hidden" button
-
Tap on the "Apply" button
-
Swipe the hidden property to the left on the "Property List"
-
Tap on the "Show" icon
-
Press the "Filter" again and switch off the "Show Hidden" button and tap on the "Apply" button to exit